Monday, November 30, 2015

E is for Travels in Europe

Back in the late 90s, Cristi and I lived in Europe for three years, so we took every opportunity to travel all over.  Unfortunately, I won't be sharing any travel planning advice for Europe in this post because it would take much more than a single post to do it justice.  Instead, below is a small sampling from a few of the places we visited to make you jealous enough to add a few things to your bucket list.

We took a whirlwind trip to Italy over the Holidays soon after we arrived in Germany in 1997.  Pisa was our first stop.  I thought the small town looked like something right out of The Godfather.  By the way, it's really hard to take a picture of the tower leaning!
 

Rome was by far my favorite European city and our third stop on the Italy tour.  There's so much to see, so much history.  And the Italian people are incredibly gracious.

The interior of the Roman Coliseum

The Roman Forum.  I loved strolling down the avenue realizing that the ancient Romans trod that same path 2000 years ago!

Venice was our fourth stop on our Italy tour.  Everyone talks about how beautiful and romantic Venice is, but we visited in January, so the entire city was unfortunately a brilliant shade of gray.  Nevertheless, Piazza San Marco was still very impressive.

St Mark's Cathedral

July 1998 saw one of the first adventures I planned for our family -- five countries in seven days.  It was very taxing, and I learned some valuable trip planning lessons (that Cristi reminded me of for years!), but we saw some amazing sites, including the most photographed church in Germany and Mad Ludwig's Neuschwanstein that inspired Disney's Cinderella Castle.

Ramsau Church:  The most photographed church in Germany.  I had a jigsaw puzzle of this church when I was a kid and was determined to see it in person.

Neuschwanstein Castle

Travel in Europe wouldn't be complete without a trip to Paris and the obligatory picture of the Eiffel Tower!


In this picture, I attempted to replicate an artsy picture I saw in a travel book.

And a Disney freak's trip to Paris wouldn't be complete without a picture of Sleeping Beauty's Castle, would it?


I also had the opportunity to tour one of the world's most famous beaches, albeit not for swimming or surfing.

Normandy Beach
American WWII Cemetery at Normandy Beach


My second favorite European city was Prague, and we visited there in June 1999.  Prague has an old-world charm that it preserved through the dark days of communism while holding the capitalistic drive for modernism at bay.

Old Town Square

Our last big European trip, in March of 1999, was to London and Ireland.

Big Ben
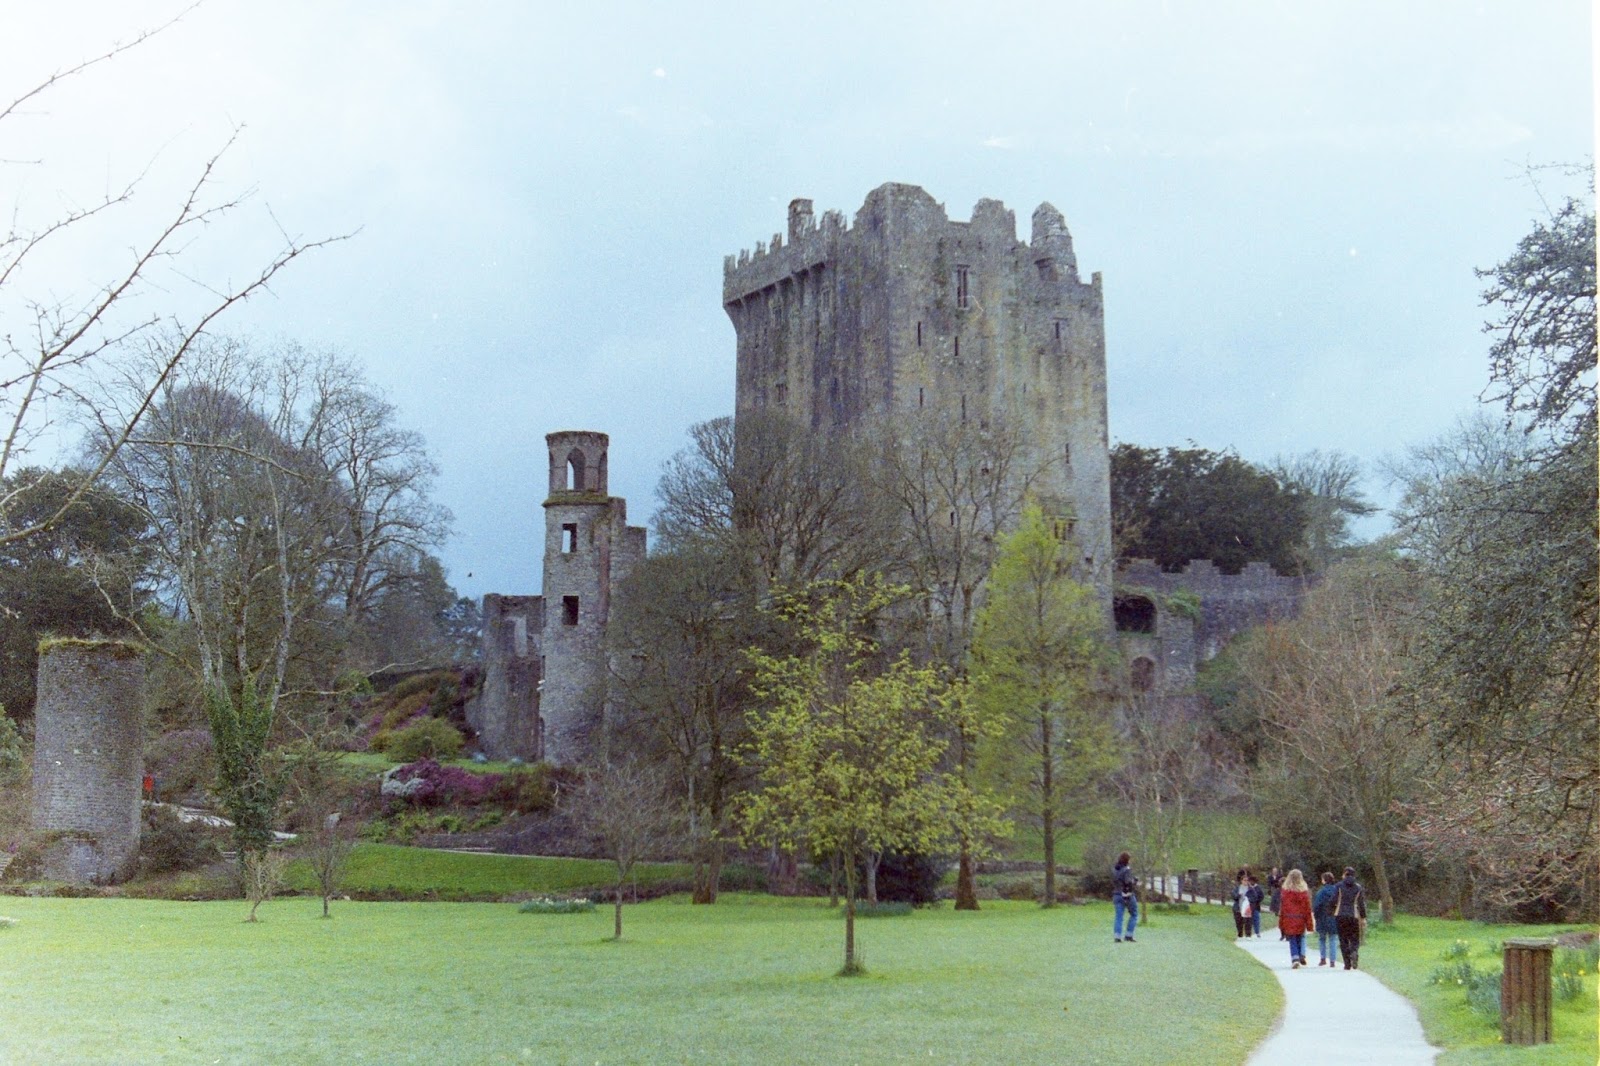
Blarney Castle.  Yes, I kissed the stone.


Blogging Through the Alphabet” style=

Monday, November 23, 2015

D is for Dehydrated Meals

The first time I went on an overnight backpacking trip, I really had no idea what I was doing.  The entire thing was really one big experiment, including food.  I won't belabor that because there will be an entire post later dedicated to that first overnight hike, but suffice it to say for this post that we really didn't eat very well.  I don't remember what we planned for breakfast, but lunch was Slim Jims and some crackers.  Dinner was a military MRE (meal ready to eat) because I thought it would be light and compact.  It was neither.

Since then, I've done a fair amount of research on backpacking meals, and there is a wide spectrum of philosophy.  Some just "get by" with cobbling food together like we had on that first backpacking trip.  Others want to eat well but like to push that "Easy Button", so they go for prepackaged food from vendors like Mountain House.  Still others aren't afraid to pay the price in weight and bulk to eat like a king and will prepare gourmet meals using their Bakepacker oven with a cook pot to bake bread, poach fish, cook rice, and make omelets.

Those that are willing to sacrifice just a little in food quality -- from 5-star to 4-star, for example -- but still want control over their cuisine usually take one of two approaches:  Mix and cook the ingredients on site in a communal pot, or dehydrate everything and pack in individual ziplock bags.  The former is easier on the front end but requires someone to carry a cooking pot, while the latter either requires you to dehydrate your own food or purchase dehydrated ingredients from commercial suppliers, such as Harmony House, FoodStorage.com, Wilderness Dining, and Amazon.

After much research and soul-searching, I finally settled on this last method for many reasons.  First, everyone gets their own bag of meals at the outset of the trip.  Second, it's the easiest method, by far, of cooking on the trail -- just add boiling water to your ziplock bag of food.  Third, it's the lightest; all you need are your food bags and a stove with a 1-liter cup/pot.  Finally, cleanup is simple; just throw your ziplock bag into whatever ziplock bag you're using as your trash bag.  The pics below are representative, except that these were on a regular trip vs on the trail.

Water boiling for the meal.
Just add water -- a little more than you think, especially for foods that guzzle water, like rice.
We made our own food cozies out of a car sunshade to insulate the food while it rehydrates. 
Consume and enjoy your delicious meal!
We've now found several meals that have become favorites on our trips:

- Thanksgiving on the Trail -- Dehydrated chicken, Stove Top stuffing, dried mashed potatoes, and Craisins (from The Scout's Backpacking Cookbook)
- Mexican Rice (get the recipe here)
- Beans + Rice with Fritos and Cheese (get the recipe here, but note that we modify it using cheese powder instead of real cheese and add all the ingredients except for the Fritos in the bag together, with only the Fritos added at the end after rehydration)
- Beefy Noodles -- 1 Ramen pkg, 1 oz instant onion soup mix, 3-5 Tbsp dehydrated ground beef, 2-5 Tbsp dehydrated vegetables, 1/4 tsp garlic powder, 1/4 tsp ground ginger, 1/2 tsp dried cilantro (credit to my hiking partner, Doc Holt, for this recipe)
- Omelet -- Powdered eggs, bacon bits, dehydrated peppers, and cheese powder on a pita (from The Scout's Backpacking Cookbook)

Once I made this decision to make my own dehydrated meals, I invested in a dehydrator, and it has been well worth it.  If you decide to go this route, I highly recommend the Excalibur 3926TB.  It's expensive, but it works much better and can hold much more food than the more consumer-oriented models.  Not all those that prepare their own meals for backpacking, however, go this route.  Noted backpacker, Andrew Skurka, buys all of his ingredients online, believing that, despite the additional cost, dehydrating his own food takes too much time and effort.  Obviously, some ingredients are near impossible to dehydrate, like milk, cheese, and eggs, but others, like rice, tomatoes, and peppers are straightforward.

We also use our dehydrator extensively for making our own jerky.  You can't have a backpacking trip without jerky (I'm pretty sure it's illegal!), and commercial jerky is pretty expensive.  The Scout's Backpacking Cookbook has a wonderful jerky recipe.  Finally, while not technically a dehydrated meal (it cooks in the oven), I also have to share that we make our own granola (trail mix) and have tweaked it to perfection.  If you'd like the recipe, you can get it off of Cristi's blog.

Ultimately, you have to decide for yourself what food philosophy you subscribe to for backpacking.  But if I've piqued your interest and would like to look for more dehydrated backpacking meals, I recommend starting your search with both Andrew Skurka and the Backpacking Chef. As an aside, these meals can also be good options for those that prefer to picnic during their roadtrips vs stopping to eat in a restaurant for each meal.

Blogging Through the Alphabet” style=

Wednesday, November 18, 2015

The Newest National Park Service Site

Only a week ago, the National Park Service announced its newest site, the Manhattan Project National Historical Park!  The site is a partnership with the Department of Energy to preserve, protect, and provide access to three important sites from the Manhattan Project:  Oak Ridge, TN, Los Alamos, NM, and the Hanford Site in WA.

The Hanford B-Reactor Site from June 1944
The intent is to tell the story of one of America's most transformative scientific discoveries, while also reminding visitors that these actions and discoveries must be handled with great care because of their world-changing consequences.  One additional point that makes this site different from almost all other historic parks is that these facilities still have active missions.  The park is in its infancy now and is expected to mature over the next few years, but it can still be toured immediately.  For more information, visit the park website or read the press release.

I love history, especially learning the various pieces that combined to make America America, so I look forward to visiting this park.  My list of NPS sites continues to grow, though.  It's now up to 434 (click here for planning resources or to track my progress on this massive list).

Monday, November 16, 2015

C is for Checklists


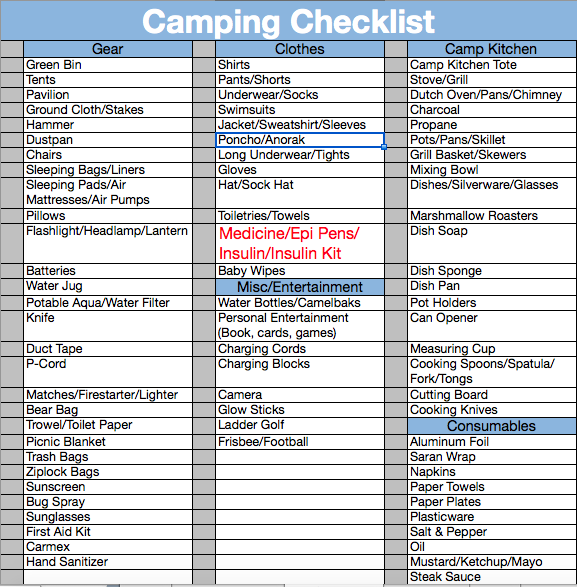
I love to camp and hike, so I do it as often as I can -- usually at least once a month, so I'm frequently pulling out the camping gear.  You would think that I would be good at packing -- that I'd have it down by now.  But, alas, I'm not.  I used to pack for camping and backpacking trips by pulling out all of the gear, going through it, setting aside what I'd need, putting back what I wouldn't, replacing batteries, and so on.  If something we needed to take wasn't in the designated "camping bin", hopefully I would remember to grab it and set it out.  Otherwise we'd likely get there without it.  While that's not such a big deal car camping since you can just run into town, when you're carrying all your worldly possessions on your back out into the great unknown, forgetting your headlamp or toilet paper -- or worse, coffee -- could be a disaster.

Then one day, it hit me:  Why not instill the same rigor of checklist discipline that the Air Force uses into packing for a camping or backpacking trip?  So I used Excel to create one checklist for camping and another for backpacking.  I always leave blank spaces at the bottom to write in additional items that may be unique to that trip or to be added in to the next edition of the checklist because I forgot to add those items originally.  In fact, I've had so much success with these checklists that I've taken it one step farther, developing checklists for our stuff to take on family vacations as well.  That's especially important for us since we have a medically complicated child and taking a trip involves so much more than throwing a few clothes in a suitcase.

I've pasted screenshots of my camping and backpacking checklists below to give you a general idea of their format and content.  They're not really suitable for public consumption in that format, however, so if you'd like an electronic copy either message me or Cristi, or post your e-mail address in a comment, and I'll send it to you (I'll be happy to delete your comment afterward if you don't want your e-mail address left posted on a public blog.)


The camping and camp kitchen checklist is the same one we use for each trip.  The backpacking checklist is a generic one I developed that I used to use and have offered to others.  I have recently modified it to be more specific to the particular gear I use, so I encourage you to do the same, whether using my checklists as a starting point or developing your own.

Blogging Through the Alphabet” style=

Monday, November 9, 2015

B is for Battlefields

Have you ever toured a battlefield, spending about fifteen minutes looking out over a big, open plain, got back in the car and thought, "Well, seen that!"?  Or maybe you went even farther, taking the driving tour along the paved park road, perhaps stopping at a few of the pullouts only to finish the tour thinking it was boring and you knew no more about the battle after finishing that long drive than before you arrived?  Well, that's a very common takeaway for folks visiting the hallowed grounds of our preserved battlefields.  In fact, I used to think the same thing.

But what if there was a way to bring those battles to life?  My friend, Andy Gudgeon, a huge Civil War scholar (and a Brit no less), taught me there is.  It just takes a little preparation beforehand and a little imagination while you're there.

The Dunker Church at Antietam
A few years ago, when we lived in the DC area, my then-9-year-old daughter was studying American History as a homeschooler.  I firmly believed that kids never really understood all the forces -- beyond slavery -- that massed on target, leading to the utter breakdown of reason and erupting into the Civil War, or how the South, ahem...the North, finally won the war, so we embarked on a unit study that included lots of background as well as a tour of all the battlefields in the Eastern Theater in order of occurrence.  My daughter absolutely loved the tours and still talks about them to this day!

Start the planning by reading the Wikipedia article for the battle you're interested in, say, this one for Antietam (yes, I realize Wikipedia brings some baggage with it, but I found the Civil War series of articles to be very good).  It's got great maps, showing the battle lines during the different parts of the battle, which is helpful to see how the battle unfolded in general.  Then, run the battle simulation from either the TravelBrains Expedition Guide (you can also get these from Amazon) or from the History Animated website.  These simulations literally play out the whole battle from start to finish, animating the battle lines on the map so you can easily see how the battle played out in cartoon fashion.  Whenever we planned a trip to a battlefield, I would play the simulation for the family, filling in any gaps with info I gleaned from the Wikipedia article.


TravelBrains Expedition Guide Samples
Take your Wikipedia article with the maps with you, along with the audio tour CD if you got the Expedition Guide.  If not, buy an audio tour CD at the Visitor Center.  As an additional tour aid, you could even take a laptop or your smartphone and replay the simulation at each point along the tour.  At each waypoint along the driving tour, get out and walk the ground.  Picture yourself being here on the day of the battle.  Use your maps and animations to determine where the lines of battle were.  What did they see and experience that fateful day?  This is where it takes some imagination, but the payoff is well worth it.  For instance, at Gettysburg, Gen Sickles moved his corps out of line and farther forward, creating a hole in the Union line.  You would never understand why he would do something so stupid until you see the ground his corps was assigned to defend.  He was completely blinded to any approach. (Unfortunately, the view was so poor, I apparently didn't think it worthy of taking a picture, because I can't find one.) Similarly, and much more famously, seeing the field of the famed Pickett's Charge at Gettysburg in the context of where the Union and Confederate lines started on Day 3 brings a much better appreciation to the preordained doom to Lee's plan.  Stand there and imagine waiting for the order to begin your charge toward the Union lines.  Then, go see it from the Union side. 
Field of Pickett's Charge, taken from where the charge started.  The Union position was located in a line where the "copse of trees" is in the very middle of the picture extending outward on both sides well past the single tree on the left and the monument on the right.
If you have kids, have some fun with it.  Do some minor re-creations along the way.  At Gettysburg, we walked the entire field of Pickett's Charge, pretending we were Rebel soldiers, marching shoulder-to-shoulder in line and climbing over the fences just as the Rebel soldiers would have done, all the while realizing that the Union line had only to fire straight ahead to take out the advancing soldiers.  At Antietam, we re-created a famous picture of dead soldiers along the Hagerstown Turnpike north of the Dunker Church, where some of the fiercest fighting of the day took place (below).


Granted, visiting a battlefield is not a great candidate for waking up on a Saturday morning and deciding to visit on the spur of the moment.  For those that love history, however, with a little preparation on the front end and a little imagination during execution, visiting a battlefield can be one of the most rewarding visits to a historic site.

Blogging Through the Alphabet” style=

Monday, November 2, 2015

A is for Assateague Island

Imagine camping on the beach, where the waves are crashing onto the shore less than a hundred yards from your campsite. Then add in an untamed and pristine wilderness where wild horses and deer roam about the island in abundance. That is Assateague Island, a long, skinny stretch of land off the coast of Maryland and Virginia, and, by far, the most unique place we've ever camped.


We camped there two separate times, at Assateague State Park in Maryland. The camping loops run all along the beach, separated from the water by a berm to prevent your camp from washing away.  Each loop has a bath house with warm showers, flush toilets, and running water for water supply or dishes.  Each site has a picnic table and fire ring, and, for those with RVs, some of the sites also have electric hookups.  If the State Park happens to be full, however, there are also other options.  The Assateague Island National Seashore, run by the National Park Service (still need to cross this site off my list -- guess I better plan another trip!), has both front-country camping with non-heated showers, running water, and vault toilets and hike-in backcountry sites with no running water and ranging from 2-12 miles away from the ranger station.  While the National Seashore covers both Maryland and Virginia, the only camping allowed is on the Maryland side.  There are also commercial campgrounds on the Virginia side on/near Chincoteague Island, home of the famed annual "pony swim".

Enjoying a memorable weekend camping on the beach doesn't come without cost, though. First and foremost, regular tent stakes will not suffice in the sand. Specialized sand stakes are required.  While many manufacturers would recommend what amounts to "oversized" stakes, like the JOGR Snow and Sand Tent Stake, I'm not confident in their holding power in a wind of any magnitude.  Instead, I recommend a much more robust stake like the Sand Hog.  These can also be manufactured very easily if you know a good welder.  Another option are the parachute/deadman style, but these take some practice and a fair amount of work, and I'm generally too lazy.

Sand Hog-like Sand Stake
Another major thing to beware at Assateague Island are the insects.  Fortunately, on the beach and at your campsite, the bugs aren't too bad, but I still recommend a screen house for eating.  And if you venture off onto one of the trails, you'll need insect repellent at a minimum, if not long sleeves and pants.
If you're a neat freak like me, you'll find maintaining a sand-free tent a challenge as well.  Therefore, I recommend instituting a policy of taking shoes off immediately inside the tent and just recognizing that you'll have some significant sweeping to do at the end of your trip.

Okay, by this point, I know you're wondering about those wild horses:  Can you see them?  Are there many of them?  Are they dangerous?  etc.  The answer is, yes, they are very abundant.  You can't help but to see them.  They are literally everywhere.  It is an awesome sight, seeing wild horses in a natural -- and so beautiful -- habitat.


But they also own the island.  And they know it.  Our first trip, we were warned to keep our food in our car because the horses would take it.  We were also told that the horses could be aggressive (they are wild after all!) so we needed to keep our distance.  Our first day after finishing a hike and coming back to our car, a horse was standing right beside our car, preventing us from getting in.  I tried to yell at him and shoo him away, but he was having none of it.  In the end, we had simply to wait until he decided to move.


Later, while getting the food out of the car, a horse approached the back and literally just pushed himself into the trunk area to get what he wanted (while I quickly moved out of his way).  He found an unopened bag of potato chips, grabbed it in his mouth, broke it open, and proceeded to eat the entire bag of chips that fell on the ground.  After he was done, he casually walked away, and a flock of about 50 seagulls converged on the crumbs as quickly as if the dinner bell had been rung at summer camp.  By the time the seagulls were done, you couldn't tell there had ever been a bag of chips.  Unfortunately, I don't have a picture because the camera was in the car (and we were in such shock as to what was actually happening).

Horses aren't the only wildlife on the island, though.  There are plenty of deer, and they're not scared either.  One morning, we were getting ready for breakfast, and Brennan was sitting in a chair just hanging out.  All of a sudden, a deer walked up to him and began licking his toes!  I told him to be still and not scare it away, and the deer just stayed there for a couple of minutes with all of us hanging out in camp.  Clearly these animals are used to people and, probably more correctly, used to getting fed by people (not by us, though).

If you like to visit pristine wilderness with a strong chance of seeing wildlife, then this place has it all!  Camping on the beach is also a unique opportunity that you don't find very many places.  A camping trip to Assateague Island is sure to generate some memories for you.  Have you been?  I'd love to hear about your experiences.  Or, if you have a question, leave it below, and I'll try to answer it.


Blogging Through the Alphabet” style=

Thursday, October 29, 2015

Adventure Blogging Challenge

Ok, so it's not a challenge to write adventure blog posts, but I needed a catchy title. In point of fact, Cristi is starting a "blogging through the alphabet" challenge with several of her friends, so she suggested I join as a way to guide my decisions on what to post -- and to ensure I keep posting!  And, since I've refocused my blog on travel, camping, and hiking, each post will focus either on a trip (adventure) we've taken or in gear recommendations.  

Just to whet your appetite, the first few (subject to change) are:
1) Assateague Island
2) Battlefields
3) Checklists
4) Dehydrated Meals

Obviously, Cristi is also doing this (you can follow her blog here), as well as her friend, Meg (her blog here).  Neither of them are going to be posting about super-cool adventures, getting you excited about all there is to experience in the great outdoors, but they're pretty cool people, so I encourage you to check out their blogs as well.  Posts start next week, so check back on the blog then!  Oh, I also want that mystery gift they're giving away if I link up all 26 weeks!  After all, I am competitive by nature!

Blogging Through the Alphabet” style=

Wednesday, October 28, 2015

Camp Cuisine

In my last post, I promised a post on what we ate while we were camping in Wyoming.  First, a little philosophy:  Camping is not the time for just "getting by" with sandwiches and beanie-weenies.  If anything, it should be amped up above the normal everyday.  That said, I don't want to spend all day cooking either (nor do I expect Cristi to).  I'm on vacation, and adventure is sounding her irresistible call.  Therefore, meals should be relatively easy.

A few of the highlights are below, but, first, a little about the camping gear we use:  Typically, we take a traditional propane 2-burner Coleman camp stove and a propane tabletop grill.  Those two will do almost everything you need.  Over the last year or so, we've also branched out into using a backpacking stove (such as a Jetboil, MSR Micro Rocket, or similar) to boil water for coffee or cook up spam or hotdogs for an on-the-go hot picnic lunch.  This time, we also brought the dutch oven (the cast iron type, not the household type).  This is one of my favorite cooking tools because it works just like an oven, and it's almost impossible to burn something in it.

A few of the highlights included:

Breakfast:
- Mountain Man (also known as breakfast hash) -- The sausage was browned ahead of time; the hash browns were dehydrated, rehydrated, and heated with sausage and eggs; the eggs were scrambled and dumped in the skillet on the camp stove with the sausage and hash browns. Note that this could have been cooked in the Dutch oven as well, adding cheese if desired. Serve by itself or as breakfast burritos.

- Cinnamon Roll Pancake -- The dry ingredients were mixed together ahead of time with the wet ingredients added on site.  The icing was also mixed on site.


Lunch/Dinner:
- Stuffed Burgers -- Made up ahead of time, stuffed with cheese and bacon.  We cooked them on the tabletop grill and sauteed onions and mushrooms in a skillet on the two-burner stove to be used as toppings.  We served them with chips.  NOTE:  This was probably our most time-consuming meal to make.  If you don't make them up ahead of time, plan for an extra hour of prep on-site.


- Chili -- The hamburger meat was browned ahead of time so all the ingredients could just be dumped into the Dutch oven and heated.


- Apricot-Ginger Pork Chops -- Marinade ahead of time, then grill. We served them with mashed potatoes cooked on the camp stove.  If this sounds as yummy to you as they did to us, you can get the recipe from Cristi's blog.

Dessert:
- Brownies -- These were made up as a dry mix with the wet ingredients added just prior to cooking.

- Berry Crisp -- The topping was mixed up on site and put on top of the berries in the Dutch oven. Put some cool whip on top, and it's just like Grandma makes!

And, of course, we made s'mores one night because you can't go camping without s'mores!

You can tell we don't go hungry when we're camping.  The meals we fix are easy to cook and clean up and keep our kids begging for more!

Sunday, October 18, 2015

Grand Teton and Yellowstone National Parks

Disclaimer:  This post turned out a lot longer than I thought it would.  If you're short on time or don't care about my ramblings, take the time to look through the pictures.  I think you'll enjoy them!

Yellowstone and Grand Teton are the 4th and 8th most visited National Parks in the US, and for good reason. Each boasts some of the most magnificent nature you will find. I originally didn't plan to make it up here in conjunction with our camping trip to Sinks Canyon State Park (you can read about the rest of the trip here) since it was 3 hours away, but our friends, the Leonards, really wanted to go. My fears were validated to an extent because it turned out to be a very stressful day. In retrospect, I'm glad we went, though, for three reasons: 1) It was beautiful; 2) I knew I wanted to spend more time up here, and it gave me eyes-on to do better trip planning for next time; 3) It marked 3 more things off my bucket list!

We hit the road at 0530 that morning because Brad wanted to get there as the "dawn's early light" was hitting the Tetons. Sure enough, we were driving into the park with the soft glow of the morning against the mountains. It was stunning!


From there we headed into the park with the intention of driving along the inner road down to Jenny Lake, but poor signage at Moran Junction left us guessing, and we wound up taking the outer road. Nevertheless, we were treated to another awesome view of the Tetons, so we stopped to heat up oatmeal and coffee while we appreciated it.


Back on the road, we passed a sign for a glacier view. This was the first glacier my family had seen, so we all ooh'd and ahh'd.  If you've never seen one, it's the large white patch on the mountains in the middle of the screen, below.


After driving a bit further, we turned down the one-way scenic loop toward Jenny Lake. Vanessa had been talking about how spectacular the view was, and it was truly spectacular. Our camera is awesome, but I'm still not sure the pictures do it justice.


Much of the rest of the drive north followed the edge of Jackson Lake, a very large and pristine lake. After stopping at the Coulter Bay Visitor Center to admire it and turn in Junior Ranger books, we headed toward Yellowstone.

I didn't realize it until recently, but the two parks are very close together. Consequently, there's no reason to not visit both parks while you're in the area (which probably also explains why Grand Teton is one of the top 10 most visited parks even though it's less famous). They're only separated by about 20 miles, and this beautiful stretch of roadway has also been preserved by the National Park Service as John D. Rockefeller Memorial Parkway as a tribute for his philanthropic donations to Grand Teton National Park and others.

Upon entering Yellowstone National Park, one of the first things I realized is that it's huge! Yellowstone is laid out with the main road forming a figure-8 through the park.  I knew going in that we wouldn't have time to see more than the bottom half of the figure-8, but seeing signs from the entrance about Old Faithful (our first planned stop) being more than 30 miles away was a little disquieting. 

Vanessa and I both have a thing for waterfalls, and we saw a sign for Lewis Falls along the way.  It was definitely worth the stop, but there was even better stuff in store for us during the rest of the day.


Old Faithful blows about every 90 minutes, so, when we arrived, we immediately went to find the predicted eruption time.  Sure enough, it was scheduled to go off within about 10-15 minutes.  While I wanted to see Old Faithful (you have to, right?), I really didn't think I would be that impressed.  Sure it's caused by volcanic activity occurring just below the surface, but after all, it's just hot water shooting up out of the ground.  Old Faithful holds a magic to it, though.  You do have to see it.  You won't be disappointed.


Afterward, we went back to the cars and fixed a picnic lunch then headed back to the Visitor Center to claim our standard souvenirs of patches and postcards.  While we were in there, a ranger announced that another geyser, Beehive, was going to erupt within the next 10 minutes -- something it only did every 12-18 hours, blowing higher and putting out more water than Old Faithful -- so we went out to see it, too.  It was very impressive and picturesque sitting right beside a stream.


Driving on, we next stopped at Excelsior Geyser and Grand Prismatic Spring.  While they don't typically erupt like Old Faithful and Beehive, they do put out considerable amounts of steam.  The water inside was a crystal clear light turquoise, but the area around betrayed all the sulfur mixed with it, staining the ground around in vibrant colors.


As we headed east toward the Upper and Lower Falls of the Yellowstone River, we were stopped by a herd of buffalo that decided to cross the road.  These buffalo clearly knew they had the right of way.  One stood halfway on the road for several minutes before several others finally decided to cross the road.  The "road guard" buffalo then casually crossed himself, allowing traffic to resume.


 Next we arrived at the trails to see the two large falls.  I didn't get very good pictures of them, though, because our family was getting tired by this point, so we chose to stay put and rest.  I definitely need to put this on the list for our next trip.


As we headed south again toward Yellowstone Lake and the entrance, I was amazed at the number of geysers you could see that steamed continually.  I had no idea there were so many and that you could see that much geyser activity as you simply drove through the park!  Interrupted from my reverie, though, we were again stopped in traffic as some people were pulling off the road and others were pulling back into traffic.  About a hundred yards distant, we noticed a large animal.  Vanessa stuck her head out of the window and mouthed "bear", so we both pulled off the road to get a better look. (For those of you panicking right now, there was a ranger there that made sure folks didn't decide to just hike out and scratch ol' Pooh behind the ears.)  I got out of the car, Cristi grabbed the camera with the zoom lens, and Brennan got on top of the car, so we handed him the camera.  Turns out it was a grizzly (you can tell by the hump behind the head) -- and Brennan did a great job getting pictures!


By this time, it was getting on toward sunset, so we stopped to admire huge Yellowstone Lake.  The soft glow against the water and the distant mountains was spectacular!


As darkness took over, we finally headed back to our campsite, arriving back about 10:30.  We were worn. out!

Lessons Learned:
So I mentioned at the beginning of this article that I was happy to get eyes-on to help ensure I didn't try to cram too much in next time we come.  I thought I'd share a few of those lessons for your Yellowstone trip planning as well:

1)  Don't try to do Grand Teton and Yellowstone in the same day.  Although they're close together, they're just too big to be appreciated in a single day even if you're staying on site.
2)  Try to go in the off season.  High season is July and August.  Your price for going then is large crowds at each of the major sites and bumper-to-bumper traffic along the figure-8 route. You may still find snow in the parks in May/June, but should still enjoy your visit.  September/October is probably the best time to go.  Some of the roads start shutting down in mid-late October, but it's open for winter activities, like snowshoeing and snowmobiling. The crowds were light by Yellowstone standards, and that was about as many people as I like to handle for a National Park. 
3)  If you only have one day in Yellowstone, do the bottom half of the figure-8.  It has all of the sites that most people would recognize.
4)  If you have multiple days, consider breaking Yellowstone up into quadrants.
5)  Sunrise and sunset really are magical times in the parks (sunrise particularly for Grand Teton because the road is on the east side).  Consider taking in at least one of those times while you're there.
6)  If you enjoy camping, both parks have campgrounds with flush toilets and showers.  Such amenities are unusual for National Parks.  If you can afford it and can get reservations, consider staying in one of the historic inns.

This day trip was amazing, and I'm glad Brad and Vanessa encouraged us to go.  It's easy to see how this area  of the country inspired our nation to preserve Yellowstone as the very first national park and why 3.5 million people visit each year. I can't wait to go back to both parks so we can spend more time there. If you want to start planning your trip, I used the Grand Teton and Yellowstone NPS sites extensively to find maps, itineraries, and places to stay.  If you've been to either of them before, I'd also love to hear your ideas on what to see, how much time to spend, and where to stay.