Saturday, March 26, 2016

Florissant Fossil Beds NM

Can you believe there were once Redwoods in Colorado?  Ages ago, a Redwood forest thrived in a valley in central Colorado.  Even more impressively, it's a valley at 8000 feet above sea level.  Then, a super-volcano erupted a hundred miles to the northwest sending ash and mudflows to blanket the Florissant valley, covering approximately the bottom 15 feet of the trees.  Geologists tell us that the trees above the ground then decayed away leaving the stumps to petrify under the mud-ash layer (I'm not sure I believe the supposition about decay; otherwise wouldn't there be evidence of the remaining 250 feet of Redwood tree trunks from a forest of them?)  Those petrified Redwood stumps, along with a myriad of fossilized insects, plants, and small mammals, were discovered approximately 150 years ago, and Florissant Fossil Beds was born.


These pictures don't provide great perspective, but the top three were all at least 6 feet in diameter.  The bottom one was significantly larger.
At first, some paleontological research was being conducted in the area, but it quickly developed into a stiff commercial tourism market.  Florissant became a boom town as tourists came in droves to see the Redwood stumps and dig for fossils.  Consequently, a significant percentage of the tens of thousands of fossils here were removed before scientists could study them.  Attempts were even made to remove the petrified Redwood stumps.  As you can see in the picture below, there are still remnants of saw blades where a company attempted to saw a petrified stump into pieces to make it easier to transport.
Notice the two brown dots toward the top.  Those are broken off, rusty saw blades.

Not everyone came for the fossils, though.  After losing two husbands and two houses, Adeline Hornbeck applied for land under the Homestead Act and struck out west in 1870 hoping for a new life.  Here in the Florissant Valley, she constructed a house and several out-buildings while raising four kids on her 160-acre parcel of land.  That homestead still stands today as part of the National Monument.


Besides crossing off another NPS site, I was also itching to get some hiking in.  The monument has 15 miles of trails that criss-cross the park, and I struck off on the largest loop I could make -- about 9.5 miles.  The terrain was mostly rolling hills and grassy meadows, but mountains surrounded the countryside in the distance and a couple of creeks ran through the park, making for beautiful scenery. One creek wound beside the Hornbeck homestead, and the trail crossed another at the farthest point away from the visitor center.  With several days of warm weather just prior to my visit, the snow was almost gone, but there were a few miniature iced-over "snow fields" that crossed the trail.  The trail was well marked and easy to follow, though.


The back side of Pikes Peak in the distance.


You can barely tell it here, but a stream babbled out from the middle of a mound of boulders.
 Altogether, I spent about four hours at the park, including viewing the park's film, shopping in the gift store, and hiking the trails.

Monday, March 21, 2016

U is for Underwater Adventures

I was deployed to Djibouti in 2004 and, while there, I had the opportunity to get SCUBA certified.  It was an amazing opportunity and a true bucket list completion.  The irony is that, like most African third-world countries, Djibouti is very poor, desert-like, and just flat ugly.

Djibouti City

The day I had seen it all.  Then again, there was the camel walking down the middle of Main Street...
A Nice Treat on My Run.  Too bad my eyes were closed...
But step foot offshore and the water is as blue as you can imagine.  In fact, that area of the world boasts some of the world's nicest coral reefs (in the Gulf of Aden, between Yemen and Somalia).  I went on three different trips while I was there and was captivated by the breathtaking underwater beauty!  I saw beautiful coral and sea anemones, a moray eel, a shark, and, most importantly, I found Nemo!  Unfortunately, my pictures (taken with a disposable waterproof camera) don't do the beauty justice and most didn't even turn out good enough to show.

I'm not sure if this is Dory or not, but that's what I thought when I took the picture.

Nemo!  And his Dad!
We also saw dolphins off in the distance and got to swim right beside a group of manta rays!  Unfortunately, I don't have any pictures of those!


In my quest to see as many National Park sites as possible, I look forward to getting down to some of the tropical sites, such as Biscayne National Park in Florida, Dry Tortugas National Park in Florida, Virgin Islands National Park, or Virgin Islands Coral Reef National Monument for another opportunity to take in more of nature's underwater magnificence!

Blogging Through the Alphabet” style=

Monday, March 14, 2016

T is for Tents vs Tarps

In my previous post about my first backpacking trip, I shared that I took a 3-person tent for shelter.  Basically, it was a Target-brand version of the standard Coleman 3-person tent.

My 3-person tent, packed and loaded at the top of my backpack
The same tent, (almost) set up
Can you imagine carrying that thing for several miles over several days?  Since that time, I've experimented with several shelter options in my quest to decrease weight and bulk for backpacking trips.  I was also fortunate that Doc, my backpacking partner in Arizona, was on the same quest.  It comes down to two basic types of shelters:  tents and tarps.

Tents vary considerably in shape, weight, and amenities.  In fact, that same 3-person tent I took on my first trip could be a decent option if split amongst multiple people, for instance with one person carrying the tent, a second carrying the poles, and the third carrying the fly and stakes.  3-person tents are really only meant for 3 people doing nothing but sleeping, however, so packs would have to stay outside.  If divided among 2 people, packs could fit inside, but each person would (obviously) just have to carry more.

Three-season backpacking tents have also become very popular.  Most are mummy-shaped to match your sleeping bag and pad and include a fly that reaches all the way to the ground to provide a covered area for your pack outside the tent-proper.  Because they're engineered to maximize durability while minimizing weight, though, they tend to be quite expensive.  Most run on the order of $200.  That said, I found a great deal on the No Limits Kings Peak II 2-person backpacking tent at Academy Sports a few years ago for $70 (pictured below; click here to view online).  I've been extremely happy with this one, but I use it as a one-person tent.

Academy's No Limits Kings Peak II, shown with the fly on and closed
Shown with the fly and side door unzipped

Shown packed alongside hammer to depict size (don't take the hammer backpacking! :)
Backpacking tents still tend to be heavy.  My Kings Peak II weighs in at 5+ pounds.  Even if you're willing to pay more, the payoff in weight loss is usually no more than a little over a pound.  To take off more weight and get a tent that weighs only 2-3 pounds, be prepared to shell out $300-$400.

Another option that is very popular among backpackers today is a tarp.  They come in all shapes and configurations, but the flat tarp (in my opinion) is the best because it's the most versatile.  The number of configurations you can set it up in is almost limitless (SGT Rock's website gives several common configurations).  Tarps are also light -- much lighter than tents in most cases!  This is primarily because you only have the weight of the tarp material and guylines since any support needed can be provided by trekking poles, a stick you find around the campsite, or by tying the tarp off to trees.  I have a Bear Paw Wilderness Designs 8x10 Sil-Nylon Flat Tarp, and it weighs less than a pound (not including stakes).

One potential drawback to tarps is that most tarp pitches leave at least one opening to the outside world (i.e., you're not completely enclosed).  I haven't had a lot of exposure to camping in wet weather, but I'm told that if you pitch and orient your tarp correctly, you can stay just as warm and dry as you can in a tent.  While I believe this to be largely correct, realize that you don't always have the luxury of those choices at your campsite, especially if you're camping with several people.  Additionally, because in the desert I was afraid of a snake or scorpion snuggling up next to me in the middle of the night, I bought a bug net to go with my tarp.  It's a fully enclosed "mini-tent" made out of bug net material, so it's very light.  The tarp and the bug net together weigh about two pounds.

My tarp, shown with the bug net
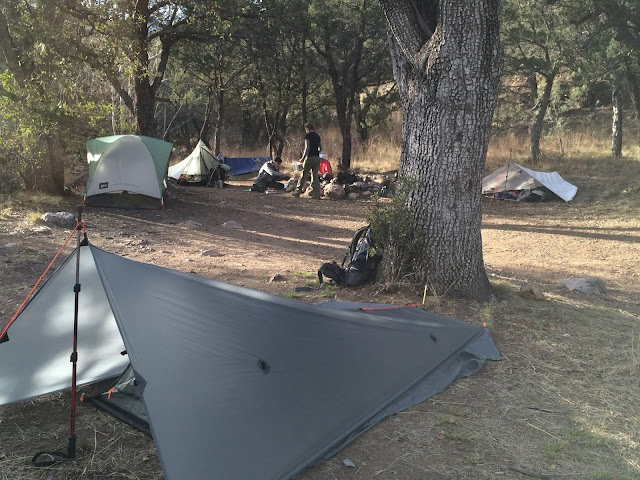
My tarp in the foreground.  Doc's TarpTent is in the back left behind the REI 3-person tent
While, just with most backpacking gear, you can cut weight and bulk with more money, tarps don't have to be expensive.  On my second backpacking trip, I went with a group of scouts that preferred to sleep under the stars, so I took an 8x10 tarp just like you can buy at Wal-Mart or Lowe's.  Unfortunately, it was raining.  Lacking experience on tarp setup, I literally wrapped up in the tarp like a burrito.  It wasn't pretty, but I stayed warm and dry.

If tents seem too heavy, but tarps seem just a little too primitive for you, some companies make hybrid products.  They are as light as tarps, but they set up more like tents.  My hiking partner, Doc, used a couple of different products, including the TarpTent ProTrail.  It really is the best of both worlds.  (In the picture above, Doc's TarpTent is in the back left of the photo.)  The only downsides are that it's a little expensive ($225) and, like tents, they're really one-trick ponies.  In other words, you only get one type of pitch, so if you find a campsite that doesn't fit that optimally, you're stuck.

As an aside, many backpackers are now opting for hammocks both out of comfort and to minimize the environmental impact of covering the ground.  I'm intrigued by this new trend but as yet have no experience with it.  My initial research, however, shows that a backpacking hammock system weighs on the order of 3-4 pounds when accounting for an underquilt to provide warmth and a tarp and bug net to protect you from the elements.  All that gear will also set you back $300-$500.  Many that have tried it say the better night's sleep is well worth the trade-off, though.

Ultimately, the choice you make comes down to a few factors:  First and foremost your comfort and expertise.  If you can't imagine sleeping under a tarp open to the elements or aren't familiar with setting up a tarp, the extra weight of a tent might be worth it.  Additionally, if I expected a strong chance of snow or rain, I might opt for the tent instead of the tarp so I didn't have to worry about the possibility of ruining a good night's sleep and possibly dealing with wet gear the next day.  Practice and experience can mitigate many of those fears and inadequacies, though.  Practice setting up the tarp in your backyard will make the setup go smoother.  And experimenting on a night with bad weather has low risk as well since you can come inside at any time.  Personally, I like the flexibility my tarp provides and the weight it saves.  I would pack a tarp on 90-95% of the backpacking trips I go on, knowing I could be reasonably well protected on a night with unexpected wind and rain.


Blogging Through the Alphabet” style=

Wednesday, March 9, 2016

Capulin Volcano NM

Ever wondered what it would be like to go down inside a volcano but figured it wasn't possible for mere mortals?  Well, actually, there is!  Capulin Volcano National Monument in northeast New Mexico is an extinct cinder cone volcano that has not been active for thousands of years (likely the time of the Flood).


Unlike many, this volcano is also very accessible. A road travels all the way to the top, and then there are paved trails both going around the rim as well as down into the caldera all the way down to the vent.

View from the Rim Looking Down into the Caldera

View from the Vent Looking Up Toward the Rim
The view down onto the plain from the top is stunning.  Many of the peaks in the area are a result of the same hotspot that created Capulin Volcano.


On the day we visited, there was also a herd of mule deer inside the caldera.  They continually bounded back and forth across the caldera, trying to stay out of our way.  After getting a close-up view of a couple of them, though, I'm not sure why they were afraid of us.  Each of them are about twice our size!


Although in a remote location (about an hour off of I-25 just south of the NM-CO border), this is a very worthwhile trip for the experience of walking down into the caldera of a volcano.  It's also a quick trip. We felt quite fulfilled after only about an hour, although I could have watched the deer all day!

Monday, March 7, 2016

S is for State Parks

By now, you all know my love for National Park sites.  They have some of the best experiences our country has to offer in the way of beauty, history, and recreation.  But when it comes to camping, state parks may be better.  We have found just as beautiful scenery in many of the state parks we have visited and have found the campgrounds nicer on the whole.  Many (but not nearly all) have running water, to include sinks to wash dishes and showers to freshen up.  This week, I wanted to share highlights from a few of my favorites.

Assateague, MD:
At this park, you can camp right on the beach of a barrier island off Maryland's eastern shore.  Beyond the obvious attraction of the beach, wildlife abounds in the way of wild horses and deer.  On the back side of Assateague Island is the Chesapeake Bay, so there are also opportunities for canoeing/kayaking or crabbing.  There are a few hiking trails to explore some of the more undisturbed parts of the island, but bring plenty of bug spray.  Mosquitoes abound away from the beach!  As far as camping amenities, Assateague State Park has sinks, flush toilets, and showers.


Patapsco Valley, MD:
This park follows the Patapsco River for 32 miles and is broken into several different areas.  We hiked on one of the many trails, waded in the river, walked across the suspension bridge, and played on the playground.  There is also canoeing available along the river and the world's longest arched stone railroad bridge within the park.  Camping amenities include hot showers and running water.


Rifle Falls, CO:
This little gem is off the beaten path a little ways in western Colorado but is well worth it for an overnight!  The park itself is small but it has a beautiful triple waterfall that will captivate attention for hours and limestone caves to explore.  Camping here is primitive with no running water, but there are restrooms.


Sinks Canyon, WY:
Located in western Wyoming, this park was recently listed by REI as one of the best state parks in the nation to camp at.  After staying there, I have to agree!  The scenery is absolutely gorgeous!  That said, it might be light on activities, but if relaxation is your thing, check it out.  We went with friends for a weekend and found plenty to do for 2.5 days, though.  The park is so named because the Popo Agie River "sinks" underground, traveling for a couple of miles before reappearing downstream.  You can walk right up to this geologic oddity at the entrance to the park.  You can also hike to the Popo Agie Falls, about a mile and a half upstream, where the Popo Agie River tumbles over the edge of a granite gorge in a series of cascades.  Camping here is primitive as well with only vault toilets but the campsites sit right beside the river providing beautiful sights and sounds as you relax.


Blogging Through the Alphabet” style=